You’re about to bring your fabric creations to life by embroidering eyes that sparkle with realism. To start, you’ll need to pinpoint the perfect spot for those peepers, ensuring symmetry and balance. But that’s just the beginning. With a few simple steps, you’ll be outlining, filling, and highlighting your way to eyes that seem to see right through. You’ll learn the secrets to creating depth, dimension, and lifelike expressions. So, are you ready to unlock the secrets of embroidering eyes that will make your fabric friends come alive? Now I will show you how to embroider an eye and share some single stitches with you.
Key Takeaways
- Mark the center of each eye and ensure symmetrical placement for a balanced look.
- Use a template or fabric marker to draw precise eye outlines on the fabric for accuracy.
- Create eye sockets by sinking indents slightly with a needle for a natural look.
- Embroider a precise eye outline with back stitches and fill eyes with satin stitches or long and short stitches.
- Use different stitches like the Stem Stitch, Cross Stitch, and French Knot to achieve realistic, lifelike eyes.
A Tutorial: How to Embroider Eyes on Fabric

You’re now ready to bring your fabric project to life by embroidering eyes that sparkle with personality.
Step 1: Find the position of the eyes.
To position the eyes on your fabric, measure the distance between them from the center of the face using a sewing pin and gauge. This ensures your eyes are evenly spaced and symmetrical.
Next, use a template or a fabric marker to mark the eye placement on the fabric. This will give you a precise guide for your embroidery. Make sure to mark the center of each eye, as this will help you create a more realistic look.
Step 2: Mark the outline of the eyes on the fabric.
With the doll’s eye placement marked, now take a fabric marker or template and draw the precise outline of the eyes.
This outline will serve as a guide for the embroidery process, helping you maintain eye shape consistency. Make sure the eye placement is symmetrical, as this will greatly impact the overall look of your project. Use a fabric marker to draw the outline, or create a template to achieve the perfect shape.
Step 3: Create the eye sockets at the center of the eyes.
Use a long doll making needle to create indents in the center of the eyes to form the eye sockets. Carefully sink them to achieve a natural, sculpted look on the fabric. This step is crucial in adding depth and dimension to your embroidered eyes.
As you create the indents, make sure to sink them slightly to give your doll a more realistic appearance. Remember to secure the indentation by tying threads at the back of the head to keep the eye shape in place.
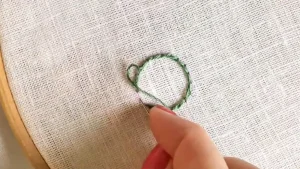
Step 4: Start embroidering the eyes.
Use a small, sharp needle to embroider the eye shape on the fabric. Make even back stitches to create a precise outline. This will give you a clear guide for filling in the eye.
Next, fill in the eye with satin stitch or long and short stitch to achieve a realistic look. Consider the thread type and thickness to achieve the desired appearance of the embroidered eyes.
Don’t forget to add highlights using a tiny straight stitch with a lighter thread color for depth and dimension. Remember to practice on swatches before embroidering the eyes on the actual fabric to perfect your technique.
Techniques for Embroidering the Eyes of Your Doll
 When embroidering the eyes of your doll, it’s important to learn different techniques to get the preferred look.
The Stem Stitch for Tracing the Edge of the Eyes
Mastering the stem stitch is crucial to trace the precise curves of your doll’s eyes with delicacy. It is a versatile technique that yields a smooth, continuous line that beautifully defines the eye’s shape.
I’ve found that the stem stitch is perfect for outlining the eyes of your doll. This stitch creates a precise and defined line that mimics the shape of the eyes. It is ideal for adding detail to your embroidery.
The Cross Stitch for Filling the Eyes
Now you’re ready to fill in the eyes with precision and detail using the cross stitch technique. This technique creates a neat and uniform appearance by weaving X-shaped stitches across the eye area. It is perfect for adding color and depth to your doll’s eyes.
To start, bring your needle up through the fabric at the center of the eye. Then, insert it back into the fabric about a quarter of a stitch away, creating an ‘X’ shape. Continue making these ‘X’ stitches, working your way outward from the center of the eye. Remember to practice on a small sample fabric before embroidering the eyes on your doll to perfect your cross-stitching skills.
The French Knot for Making Eyes on the Dolls
You can make realistic eyes for your doll by wrapping yarn or thread around the needle to create French knots. This quick and easy technique allows for versatility in eye size and shape, making it suitable for various toy projects.
The French knot provides a textured and realistic look to the eyes, making them stand out on the doll’s face. Practice on small swatches before applying the French knot technique to your doll to ensure precision and desired results.
The Satin Stitch for Creating Full Round Eyes
By employing the satin stitch, you can masterfully craft full, rounded eyes. They’re burst with intricate details, capturing the essence of your doll’s personality. This technique is ideal for creating eyes with precise details, covering the pupil, iris, and white of the eyes effectively.
To achieve realistic results, combine the satin stitch with back stitch outlining, which enhances the overall eye embroidery. With some embroidery skills and a time investment, you’ll be rewarded with beautiful, realistic results.
Conclusion
With eyes that sparkle, your embroidery comes to life. You’ve successfully mastered many ways to embroider eyes on fabric. Different methods have different pros and cons. If you are a beginner, please choose the simplest stitch to try.
Remember to practice on swatches before finalizing your design. Now, bring your creation to life with eyes that shine!
