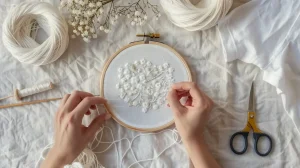
As you prepare to embroider with beads, you’ll start by drawing a straight line on your fabric as a guide. Then thread your needle with a knot at the end. You’ll pass the needle through the fabric, and pick up the beads, guiding them onto the thread snugly. You need to learn to space stitches evenly, secure them with controlled tension, and stitch them onto the fabric using a back stitch. And that’s where things get interesting…
Key Takeaways
- Draw a straight line on the fabric as a guide for even bead placement and consistent spacing.
- Use a beading thread and a needle with a small eye, and thread the needle carefully to avoid tangles.
- Measure and mark the desired bead length to ensure consistent spacing between beads.
- Secure beads against the fabric by guiding them onto the thread with controlled tension.
How to Embroider with Beads


Now that you have your supplies and a basic understanding of bead embroidery techniques, it’s time to get started
Step 1: Draw a straight line as an embroidery guide.
Begin by drawing a straight line on your fabric to serve as a guide for your bead embroidery. It ensures even placement and symmetry in your bead embroidery pattern.
This line will act as a visual aid, helping you accurately place and space your beads. To draw the line, use a ruler to create a precise, straight edge.
You can use a fabric marker to draw the line. Remember, this line will serve as a guide for your bead embroidery, so take your time and make sure it’s straight and even.
Step 2: Thread the needle and make knots at the end of the thread.
Thread your beading needle with a single piece of thin thread. You should make sure that it’s long enough to accommodate your design. Hold the thread between your fingers, leaving a small loop at the end. Tie a knot to secure the thread. Your thread is now ready for beading.
Step 3: Measure the length of three beads and bring the needle up to the measured length from the start of the straight line.
By measuring the length of three beads, you can easily establish a reliable spacing guide. So bring the needle up to the measured length from the start of the straight line to ensure accurate bead placement. By taking the time to measure, you’ll achieve a neat and professional finish to your bead embroidery project.
Step 4: Pass the needle through the fabric and pick up three beads with your needle.
Pass the needle through the fabric, then pick up three beads with the needle. As you pick up the beads, gently pull the needle to ensure they’re securely in place.
Step 5: Guide the beads onto the thread until they reach the fabric.
Use a specialized beading needle to guide the beads onto the thread, taking care not to tangle or break the thread. As you guide the beads, maintain consistent tension on the thread to secure them in place. Remember to keep the beads snug against the fabric to avoid any gaps or unevenness.
Step 6: Like a backstitch, bring the needle down at the start of the straight line.
After the beads are snug against the fabric, bring the needle down at the start of the straight line, just as you’d with a traditional backstitch. Now you are securely placing each bead in its designated spot. As you work, experiment with different bead sizes and colors to create unique and eye-catching designs.
Step 7: Bring the needle up to the measured length just like the first stitch.
Measure the length of your first stitch. Bring the needle up to that same length to ensure consistent bead placement. This step is crucial in maintaining uniformity in your bead embroidery design.
Step 8: Add three beads and pass the needle through the end of the first bead row you created.
You’re ready to add more beads to your design. So thread three beads onto your needle and pass it through the end of the first bead row you created. You’ll maintain the alignment and spacing of the beads, resulting in a professional finish. Adding three beads at a time and securing them properly will give your bead embroidery a sturdy foundation.
Step 9: Bring the needle up at the start of the straight line and pass the first beads row to reinforce it.
Bring your needle up at the start of the straight line, then pass it through the first row of beads to reinforce the foundation of your design. This crucial step ensures your beads stay in place and maintain their shape.
By reinforcing the first row of beads, you’re creating a sturdy foundation for your project. Passing the needle through the beads keeps them in place and prevents them from shifting or falling out. This adds durability and stability to your bead embroidery, allowing you to build upon this foundation with confidence.
Step 10: Continue repeating until you reach the end of the line and all beads are in place.
Repeat the process of securing beads in place. As you work, maintain a consistent tension to ensure the beads lie flat against the fabric. Use the backstitch technique to secure each bead, reinforcing the stitches to prevent them from coming loose.
Once you’ve completed the straight line, you’ll have a beautiful, beaded design that’s sure to impress.
Conclusion
Now that you’ve mastered the basics of embroidering with beads, get creative and experiment with different patterns, colors, and designs.
With practice, you’ll develop your own unique style and confidence in your stitching. Remember to keep your tension even and your stitches consistent for a professional-looking finish.
