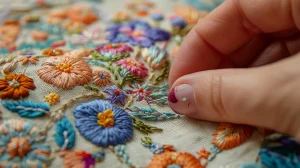
When you decide to embroider a delicate handkerchief, you’ll need to start by selecting the right materials. Choosing high-quality cotton or silk floss is essential for achieving precise and vibrant stitches. Once you’ve got your materials ready, trace your design onto the fabric with a heat-erasable or water-soluble pen. Now, threading your needle with a sharp, small-eyed needle is the next step. But before you start stitching, let’s explore some instructions that will ensure your handkerchief turns out beautifully.
Key Takeaways
- Pre-wash and iron lightweight cotton or linen fabric to prevent shrinkage and ensure smooth stitching.
- Trace your design onto the fabric using a heat-erasable or water-soluble pen for precise marking.
- Use a size 7 or 9 sharp needle for lightweight fabrics and high-quality cotton or silk floss.
- Maintain fabric tension with a high-quality embroidery hoop to achieve precise stitching and prevent puckering.
- Secure your embroidery with a firm knot, and gently wash and press the handkerchief for a polished finish.
What You’ll Need
To get started on your handkerchief embroidery, you’ll need to prepare essential supplies.
- Handkerchief: For embroidering on a handkerchief, you’ll need a lightweight square of cotton or linen fabric. Choose a fabric that’s tightly woven yet smooth. Personalizing the handkerchief with a unique embroidery design transforms it into a meaningful gift.
- Embroidery Needle: Selecting the right embroidery needle is pivotal to ensuring smooth and precise stitches on your handkerchief. The sharp point of the embroidery needle is crucial for piercing the fabric cleanly.
- Embroidery Floss: Selecting high-quality thread ensures that your colors remain vibrant and your stitches last. Each type—cotton or silk—lends itself well to different embroidery techniques. Choosing the right floss is crucial for achieving your desired artistic effect.
- Embroidery Hoop: To achieve impeccable embroidery, you’ll need to invest in a high-quality embroidery hoop. It ensures your fabric remains taut and stable throughout the stitching process.
- Heat-erasable or Water-soluble Pen: For precise and temporary marking on your handkerchief, a heat-erasable or water-soluble pen is indispensable. It allows you to effortlessly transfer intricate embroidery patterns onto fabric. Both pens ensure your embroidery designs are accurately traced without permanent marks.
- Scissors: A pair of high-quality, sharp scissors is indispensable for achieving clean and precise cuts in your handkerchief embroidery projects. Choose scissors specifically designed for embroidery; their fine tips allow you to cut close to the fabric without fraying.
How to Embroider a Handkerchief

Follow this helpful tutorial to begin hand embroidering your handkerchief.
Step 1: Prewash your handkerchief.
Begin by prewashing your handkerchief with a mild detergent in cold water.
Fill a basin with cold water and add a small amount of mild detergent, ensuring it dissolves fully. Gently agitate the handkerchief in the solution for a few minutes. Pay attention to any stained areas.
Lay the handkerchief flat to air dry or tumble dry on low heat to prevent shrinking or distortion. Prewashing ensures your handkerchief is clean, soft, and ready for precise embroidery.
Step 2: Mark the design you want to embroider on the handkerchief.
Start by placing your chosen design behind the handkerchief. Carefully trace it onto the fabric using an erasable pen. Double-check the alignment and positioning before moving forward. A well-traced design ensures a smooth embroidering process, allowing you to focus on your stitching technique and creativity.
Step 3: Hoop your handkerchief.
After meticulously tracing your design, secure the handkerchief in an embroidery hoop. It ensures the fabric is taut and centered to prevent any distortion during stitching.
Begin by loosening the screw on the embroidery hoop, separating the inner and outer hoops. Place the handkerchief over the inner hoop, aligning the design to be centered. Lay the outer hoop on top, pressing down evenly. Tighten the screw gradually, adjusting the fabric to keep it taut.
Check for wrinkles and ensure the handkerchief is flat and secure. Proper hooping is crucial; it maintains tension in the fabric, allowing for precise, clean stitches.
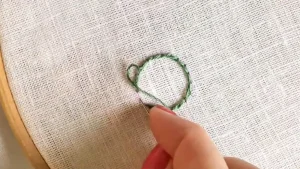
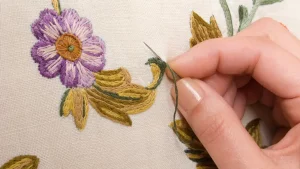
Step 4: Embroider on your handkerchief.
With your handkerchief securely hooped and design traced, thread your needle with the chosen floss. Then stitch it meticulously following the traced lines, ensuring each stitch is precise and consistent.
For a DIY hand embroidered handkerchief, employ a back stitch for outlines. It provides a clean and continuous line. Hand embroidery requires patience; take your time to ensure each stitch aligns perfectly with the design.
Step 5: Knot and cut off excess thread after finishing embroidery.
Secure the embroidery by tying a firm knot at the back of the fabric. Use sharp scissors to carefully trim the excess thread close to the knot. Be cautious not to cut the knot itself or the surrounding stitches. Double-check for any loose ends and trim them for a neat, polished finish.
Step 6: Remove the hoop, then clean and iron your handkerchief.
Now you’ve finished embroidering on handkerchiefs. Gently release the handkerchief from the embroidery hoop to prevent any distortion or stretching of the fabric. Once you’ve removed the hoop, carefully inspect your embroidery work to ensure all stitches are secure.
Next, clean the handkerchief by gently hand-washing it in cool water, avoiding any harsh detergents. Press it between two towels to remove excess moisture. Lay the handkerchief flat and use a hot iron to press it, ensuring a smooth, crisp appearance.
Your handkerchief is now ready to be a great gift for friends and family, showcasing your beautiful embroidery craft.
Tips for DIY Embroidered Handkerchief
When crafting your DIY embroidered handkerchief, consider several tips for beginners.
Consider the material of handkerchief you’re using.
Selecting the right handkerchief material is crucial to ensure ease of stitching and the durability of your embroidered design. Choose a lightweight fabric like cotton or linen, which allows your needle to glide through effortlessly.
Use a heat-erasable or water-soluble pen.
These specialized pens allow you to create detailed markings without the risk of permanent stains. A heat-erasable pen will vanish with the application of heat, such as ironing. Conversely, a water-soluble pen disappears with a gentle wash. Always test the pen on a scrap piece of fabric to confirm easy removal before marking your handkerchief.
Choose high quality floss which is colorfast.
Choosing high-quality, colorfast floss is crucial. It ensures your embroidered handkerchief retains its vibrant colors and resists bleeding during washes.
Conclusion
Congratulations! You’ve now mastered the intricate art of handmade handkerchief embroidery. By carefully selecting your materials and employing expert sewing techniques, you’ve created a personalized piece that showcases your skill.