There are many basic embroidery stitches like back stitch, split stitch, long and short stitch, stem stitch etc. Today we’ll learn how to do the satin stitch in embroidery. First tracing your design onto the fabric gives you a guide, ensuring precision. Begin stitching from the middle of the design and keep your stitches parallel. It’s crucial to straighten the floss before each stitch to maintain uniform tension. Now let’s learn this step-by-step tutorial to refine your technique and tackle common challenges.
Key Takeaways
- Trace the pattern onto fabric to guide your stitches.
- Begin stitching from the middle of the pattern for even coverage.
- Keep stitches parallel and close together for a smooth finish.
- Use a backstitch outline to maintain shape and neatness.
- Maintain consistent stitch length and tension to preserve design integrity.
How to Embroidery Satin Stitch

I’m using satin stitch to fill in the patterns. Here are the detailed instructions.
Step 1: Determine the pattern that you’ll fill in.
Selecting a clear, well-defined pattern is crucial for achieving a polished satin stitch. Begin by choosing a design that has distinct lines and edges. Trace the pattern onto your fabric using a water-soluble pen, ensuring all details are clearly visible. If you’re new to satin stitch, start with simpler shapes to build confidence and skill.
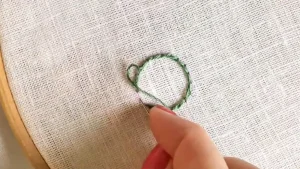
Step 2: Starting in the middle of the pattern, bring the needle up from the back of the fabric along with the pattern line.
Start in the middle of your pattern. Bring the needle up from the back of the fabric right along the pattern line. Carefully pull the needle through the fabric, making sure it emerges exactly on the drawn line. This embroidery tutorial emphasizes starting in the middle to control stitch direction and spacing. By doing so, you’ll ensure a smooth satin stitch that covers the shape evenly.
Step 3: Bring the needle down directly across from the previous stitch.
You should bring the needle down directly across from the previous stitch. It ensures that each stitch aligns neatly next to the other, creating a cohesive and polished look. This technique helps keep your satin stitch smooth and seamless.
Step 4: Straighten the floss to form the first stitch.
Straighten the floss meticulously to ensure that it lies flat and untwisted. Master the art of creating a flawless and seamless initial stitch. This step is crucial in embroidery, especially for the satin stitch.
Gently run your fingers along the length of the floss to remove any twists or kinks. This ensures that the first stitch lays flat against the fabric, contributing to a clean, professional-looking finish. Keeping the floss straight prevents uneven tension and gaps, which can disrupt the uniformity of your satin stitch.
Step 5: Bring the needle up right beside the starting point of the first stitch.
Now bring the needle up right beside the starting point of the initial stitch. You can create a seamless transition between stitches. This technique helps fill shapes evenly and neatly, enhancing the overall quality of your design.
Step 6: Bring the needle down beside the end of the first stitch. Now you’ve finished two parallel straight lines.
Bring the needle down exactly next to the end of the first stitch. Then you’ve completed two parallel straight lines. Achieving neat stitches involves careful attention to the placement of each stitch. By placing the needle down beside the end of the first stitch, you create consistent, parallel lines.
Step 7: Continue this process until you reach the end of the pattern.
Continue stitching meticulously, ensuring each stitch remains parallel as you work your way to the end of the pattern. As you progress, maintain the integrity of the satin stitch by keeping your parallel stitches closely aligned. Each stitch should cover the shape evenly, without any gaps or overlaps.
Tips for Doing the Satin Stitch
To achieve a flawless satin stitch, follow these tips.
Keep the stitches parallel, and close together without overlapping.
For achieving a flawless satin stitch, ensure your stitches remain parallel and close together. Avoid any overlap to achieve a seamless and professional finish. Focus on maintaining parallel stitches with even spacing to achieve a smooth finish. Practice on spare fabric to refine your technique.
Don’t pull the stitches too tight.
It’s crucial not to pull your stitches too tight as this can distort the fabric. When you’re working on a satin stitch, maintaining consistent tension is key. Tight stitches can create unwanted ridges and gaps.
Stitch along the outline of the pattern.
Always stitch along the outline of your pattern. Ensure that each stitch is perfectly on the drawn edge for a clean and defined look. You create an outline that guides the subsequent satin stitches, ensuring they stay within the intended area. Using a backstitch outline will help maintain the shape and keep your work neater.
Conclusion
Mastering the satin stitch takes practice, but you’ll see improvement with each project. Remember to start in the middle of your design and keep your stitches parallel and evenly spaced.
With patience and attention to detail, you’ll achieve beautifully embroidered pieces. Keep practicing, and soon, satin stitching will become second nature.
