Embroidering a heart begins with the right supplies: embroidery floss, needles, a hoop, and fabric. Choose a heart pattern and make it bold or delicate with varying thicknesses of floss. Once your fabric is secure in the hoop, use a single strand for outline or all six for bulk. Chain stitches for textured lines, Lazy Daisy and Satin stitches for smaller hearts. For larger hearts, use the long and short stitches to give depth and dimension. Play with colors and textures. And remember, the possibilities for your fabric canvases are limitless. Your heart eagerly awaits the inspiration of your creative touch. There are several simple ways to embroider a heart. Imagine what you could learn next.
Key Takeaways
- Select a heart embroidery pattern and gather necessary supplies like embroidery floss, needles, hoop, and suitable fabric.
- Secure your fabric in the embroidery hoop to prevent distortion while stitching.
- Begin embroidering the heart using chain stitch for continuous lines, or lazy daisy and satin stitches for smaller hearts.
- For larger hearts, break down the pattern and use the long and short stitch to create depth and dimension.
- Experiment with different floss colors and textures for enhancement, and to give a realistic look to your embroidered heart.
Supplies You Need

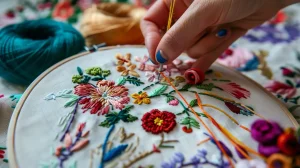
Before you begin your heart embroidery project, it’s essential to have the right supplies on hand. You’ll need embroidery floss, needles, an embroidery hoop, and a piece of fabric that suits your design. Additionally, a heart embroidery pattern will guide your needlework, creating a beautiful piece you’ll love.
Embroidery Floss
To make a beautiful heart embroidery, you’ll need embroidery floss, a versatile supply for hand embroidery projects. It’s usually made of cotton, silk, or wool and comes in many colors. It’s great for bringing your heart embroidery patterns to life on your fabric.
Floss is made of strands that can be separated or combined to create different thicknesses and textures in your work. For instance, you might use a single strand for delicate outlines and all six strands for a bold, full satin stitch.
Embroidery Needle
Next, you’ll need an embroidery needle. It’s longer and sharper than regular sewing needles, and it’s made for the different techniques used in embroidery.
The needle you choose is crucial when stitching your heart pattern. Embroidery needles come in different sizes, with crewel needles for fine work and tapestry needles for heavier fabrics. The needle size should match the fabric and thread you’re using for your project. The right needle ensures smooth stitching and minimal fabric damage.
Embroidery Hoop
When it comes to gathering your embroidery supplies, don’t overlook the importance of a good embroidery hoop. Use this round frame with a screw to stretch and hold your fabric firmly. It will make stitching your heart design easier.
Hoops come in various sizes – 4, 6, 8 inches and more. Choose one that comfortably fits your project, giving you plenty of room to stitch without crowding your heart. The hoop, made of wood, plastic, or metal, keeps the fabric steady for neat and professional embroidery.
A hoop with a spring tension mechanism can make securing your fabric a breeze. Remember, a well-stretched fabric is key to a beautifully embroidered heart.
Fabric
Choosing the right fabric for your heart embroidery project is important. It will be the canvas for your design. Opt for fabrics suitable for embroidery such as cotton, linen, or even felt. Make sure your fabric is clean, wrinkle-free, and provides a smooth surface for your stitches.
A light-colored fabric can make your heart design pop, while a darker one offers bold contrast.
Feel free to experiment with different fabric textures and weights. They can significantly influence the final look of your embroidered heart. Remember, your fabric choice sets the stage for your beautiful heart embroidery.
Heart Embroidery Patterns
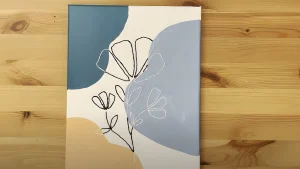
Choose an embroidery pattern that suits your skill level and reflects your style preferences before starting the heart embroidery project.
Transfer the pattern onto the fabric with a water-soluble pen or transfer paper. This will give you a clear outline to follow.
Practice various stitches like the cross stitch, satin stitch, or French knot on a sampler first. It’s all about feeling comfortable with the technique. Mix up thread colors and fabric types for a personalized touch.
Scissors
In your embroidery journey, you’ll find that a pair of sharp, durable scissors is a basic companion. Whether you’re cutting fabric or snipping threads, the right scissors can make all the difference.
Choose embroidery scissors with small, pointed tips for precision cutting, especially when dealing with intricate heart designs. Look for a comfortable handle, as your hand will likely hold these scissors for extended periods. Also, consider the material of your scissors. Stainless steel or other high-quality materials ensure durability and longevity.
Don’t forget to keep your scissors clean and sharp. By using them exclusively for embroidery, you’ll avoid dulling the blades. In essence, a good pair of scissors is key to bringing your embroidered heart to life.
A Fabric Marking Pen
As you continue with your embroidery project, you’ll discover that a fabric marking pen is a must-have tool. This specialized tool allows you to transfer your heart patterns onto fabric with precision.
Available in various colors, it lets you distinctly mark different parts of the design. Choose from fine point, chisel tip, or dual tip styles to match the intricacy of your embroidery work.
The ink, usually water-soluble, disappears or fades with water or over time, so your embroidery remains neat and unblemished. So, before you begin to embroider your heart, ensure accurate placement of your design by using a fabric marking pen. It’s a small yet vital step towards creating your masterpiece.
How to Embroider a Heart Outline

Now, let’s move on to the exciting part – embroidering the heart outline.
You can embroider a simple heart using techniques like the split stitch, back stitch, stem stitch, or even the chain stitch.
Each stitch has its own charm, so don’t be afraid to experiment and find the one that best suits your style!
Use Split Stitch
To create a neat and continuous outline for your heart embroidery, you’ll want to master the split stitch. This versatile stitch is perfect for outlining your heart shape on fabric.
Begin by bringing your needle up through the fabric. Then, move a small distance forward and push the needle back down, splitting the previous stitch. This creates a connected line that’s ideal for following the contours of your heart design.
Keep repeating this process, adjusting the length of your stitches as necessary. Remember, practice makes perfect, so don’t be discouraged if it doesn’t look perfect on your first try.
Be patient and persistent, and you’ll soon master the split stitch. This stitch will help you create elegant outlines for your embroidery projects.
Use Back Stitch
After mastering the split stitch, you’re ready to tackle the back stitch, a fundamental technique for embroidering a heart outline. Grab your fabric and thread: it’s time to get stitching.
Start by pushing the needle up from the back of your fabric. Make the first stitch, then bring the needle up a short distance away to create the next. This forms the outline of your heart. Multiple strands of thread will yield a bold look, while a single strand gives a delicate finish.
Maintaining a consistent tension is key. Too tight, your fabric puckers; too loose, your stitches wobble. Practice until your tension is just right.
Lastly, secure your work with a tiny back stitch to prevent unraveling. Your heart template is now finished.
Use Stem Stitch
Embroider a charming heart outline using the stem stitch to infuse it with character and charm. Start by threading your needle with a strand of embroidery floss in your desired color.
Bring the needle up through the fabric from the back, at the point where your heart shape begins. Now, make a small stitch forward, bringing the needle back down but leaving a loop of thread on the surface. This forms the first line of your stem stitch.
Continue this process, keeping your stitches close to filling the outline. Adjust the curve as needed to maintain the heart shape. With each stem stitch, watch as your heart outline takes shape, one smooth, beautiful line at a time.
Use Chain Stitch
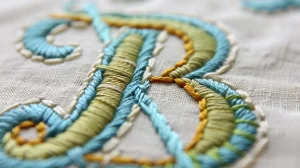
Learn chain stitch, a versatile embroidery technique perfect for outlining your heart design with a textured and continuous line.
Begin by guiding your needle up through the fabric, forming a loop. Carefully insert the needle back into the same hole and pull the thread to secure your first chain stitch.
Repeat this process around the shape of your heart, passing the needle through the loop made earlier before pulling the thread, to create a decorative chain. With each stitch, you’ll see your heart design come to life.
Practice control and consistency in your stitches for a smooth, even outline. Embrace the charm of chain stitch embroidery, and watch as your heart design gains depth and character.
How to Embroider a Small Heart

Now, let’s shift our focus to creating a small heart.
To achieve this, you’ll be using two types of stitches – the Lazy Daisy and Satin stitch. I will teach you how to use these stitches to embroider a heart.
Both stitches give your heart design a detailed and textured look, great for adding a touch of love to any embroidery project.
Use Lazy Daisy Stitch
Using the Lazy Daisy stitch, you can effortlessly embroider a small, delicate heart on your fabric. Start by bringing your needle up through the fabric at the heart’s center point. Form a thread loop and secure it with a small stitch at the base. This is the essence of the Lazy Daisy stitch.
Continue making these small loops around the center point, manipulating the size and shape to form half of your heart. Remember, the beauty of embroidery lies in the details, so take your time and ensure each stitch is secure.
Once you’ve completed half, mirror your stitches to finish your heart. The last loop should be secured with a tiny stitch to complete your embroidered heart. I recommend the lazy daisy stitches to make an embroidery heart. This versatile technique allows for creative, personalized expressions of love.
Use Satin Stitch
The Lazy Daisy stitch is playful and delicate, while the satin stitch allows you to make a small heart with a smooth, shiny appearance.
Start by threading your needle with embroidery floss. Next, secure your fabric tightly in the hoop to maintain even tension. Now, bring your needle up at one edge of the heart outline and take it down at the opposite edge. This is your first satin stitch.
Continue repeating this stitch, placing each one next to the other, until the heart is filled. Practice is key here. Get comfortable with the satin stitch technique, maintaining even tension and close placement.
With some patience, your small heart will be a glossy, satin-stitched delight.
How to Embroider a Large Heart

Embroidering a large heart requires a bit more patience, but the result is worth every stitch. You’ll want to secure your fabric in a large hoop and grab a thicker thread to really make your heart pop. Split the pattern into smaller sections to create symmetry and use long and short stitch techniques to add depth and texture. The following tutorial will help you embroider an entire heart simply.
Use Long and Short Stitch
For a large heart embroidery that’s brimming with depth and dimension, the long and short stitch is your best friend. Begin by outlining the heart shape with a split or back stitch.
Then, fill it in using long and short stitches, creating a beautiful gradient effect. You can create a shading effect by changing the lengths and spacing of your stitches.
The trick is to blend different colors of embroidery floss smoothly, transitioning from light to dark areas within the heart. This technique will give your embroidered heart a realistic look.
Don’t be afraid to practice different stitches. Mastering this technique will improve your heart embroidery projects.
Conclusion
You’ve done it! You’ve skillfully navigated the intricate world of embroidery, and your handmade heart is a testament to your perseverance and creativity.
It is fun to embroider a cute and nice heart on your bag. Each one stitch you’ve made tells a unique story of your journey. Wear it proudly, gift it lovingly, or continue honing your skills with more complex designs.
Remember, each thread weaves not just a pattern, but a piece of your heart. Keep crafting, keep creating, because the world needs your unique touch.